
|
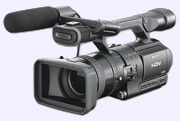
| urbanfox.tv > camera workbooks > Sony HVR-Z1 contents page > Part 8: Recording formats and tapes |
|
ON THIS PAGE: In need of some Z1 or FX1
|
|
RECORDING FORMATSThe Z1 records in three different formats DV, DVCAM and HDV. So, what is the difference between DV and DVCAM recording? The short answer is not a lot. Certainly in terms of picture quality there is NO difference.In the DVCAM format:
If you are:
But why record in DV or DVCAM, when you can have HDV... SO HOW IS HDV RECORDED? DV and DVCAM record whole (I) frames onto the tape. Each frame is compressed in order to get all that information onto a miniDV tape. The amount of data created in HDV is far greater than in DV (or DVCAM) but it still has to fit on that little miniDV tape. So, the engineers had to find a way to more efficiently compress all that information. Step forward MPEG2 encoding. With MPEG2 the camera does not record all the information in every frame that makes up your video recording. It records occasional key frames (I frames) and just enough information to enable it to recreate the rest . The video between one key frame and the next is called a Group Of Pictures (or GOP). A Group of Pictures consists of three types of frames - the I-frame, P-frame and B-frame. (Intra frame, predictive frame and backwardly predictive frame.) The I-frame holds the most information and is the largest frame size in terms of data. The P-frame is compressed further and holds less information than the I-frame. It predicts what will make up the image from the previous I-frame or P-frame. Then comes the B-frame, which holds the least amount of information. It is calculated by forward and backward prediction to I-frames and P-frames or even an estimate of the in between value of them. A typical GOP consisting of 12 frames (in PAL) will be: PROBLEMS WITH HVD AND MPEG 2 This is a very efficient way of encoding and compressing a lot of information to fit on a small miniDV tape. However, it does have a downside. A small amount of dirt on the heads when recording in DV (or DVCAM) mode could result in dropout problems on a single frame because each frame is independent of the other. With MPEG2 a small bit of dirt causing dropout on an I-frame could affect half a second of video, ie the whole GOP. This is why Sony manufacture a brand of miniDV tape just for HDV - which it claims will be more reliable. MPEG2 also causes software writers, designing editing software, sleepless nights. Only the I- frames hold all the picture information - but when editing you want to edit between any frame. If you intend to edit in HDV make sure you have a high enough specified Mac or PC. MPEG2 also suffers when the camera moves to much (ie pans, tilts or zooms) or if you have fast moving subjects (sport). During movement every pixel making up the image will change from frame to frame. thuis puts a lot of strain on MPEG2 and you may find that your image will reduce in quality - it may look blocky or just lack detail - ie you'll see green but not necessarily grass. |
|
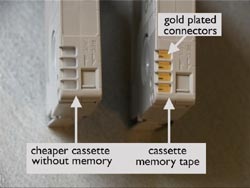
WHICH TAPE SHOULD I BUY?I want to stress again - whichever tape you buy, you can record DV, DVCAM or HDV onto it. There are a whole range of video tapes available... 1. 2. You can also buy the expensive ‘chipped’ tapes which have their own memory chips. These memory chipped tapes are not essential but, you will need them if you want to use the END SEARCH function (if the cassette has been ejected and then put back into the camera). I honestly don’t think they are worth the extra money. 3. Only Sony makes DVCAM tapes. So, with no competition they can be very expensive, around £7.00. According to Sony they are more robust and have a lower drop out rate. They are also less likely to shrink over time so, are better for archiving. They come in a nice blue box. If these things are important to you it may be worth paying extra.
5. Always buy a cleaning tape and take it with you on every shoot. Make sure you know how to use it - read the instructions carefully. Cleaning tapes are abbrasive in order to clean the dirt and gunge off the record heads. But, that also means they wear down the heads faster than a nomal tape. Over zealous cleaning, fast forwarding and rewinding the cleaning tape will age the heads prematurely. Check the camera manual for details.
When you've finished recording on a tape always write the date, your name and story name on the label - then engage the protection tab to stop anyone recording over your precious pictures. |
|
|
|
PUTTING COLOUR BARS ONTO THE TAPEIt is a good idea to record about a minute's worth of bars and tone at the start of each tape. For several reasons.... · The first (and last) minute of tape is the most likely to be damaged in the factory - because the ends are "handled" when the tape is attached to the spools. So, by recording something that is not for transmission (ie bars) on those first few seconds you reduce the risk of using damaged tape for your good stuff. · Bars and tone can be useful in identifying some camera faults. I'm not an engineer, but those who are tell me they can. · Non-linear editing software likes some wiggle room (or Handles). If your first shot is right at the start of the tape, your software may be unable to import the beginning of the shot. · The bars and tone are used to line up any edit suite/circuit/OB truck that is relaying and receiving your pictures and audio. It is always best to line up using an internationally recognised signal (such as bars and tone). So, if I record them at the correct level on the camera and they appear on the NLE at that level - then I know I'm not adding or subtracting anything from my original pictures. Of course, you should line up your monitors too. So, in theory all the effort you put into shooting that moody scene still comes over as moody on my TV at home - not washed out or too dark to see what is going on. I say 'in theory' because few of us watch our TVs in a perfect viewing environment and TV sets have their own colour cast anyway (but, that's another story). To record colour bars, flip up the LCD screen and press the BAR button. The colour bars will appear in the LCD screen. If you have a separate tone generator switch the tone on and set sound levels to -18dB. Press the RECORD button and record about 1 minute of bars and tone.
|
|
|
|
 Bog
standard miniDV cassettes – these are made by Sony,
JVC, Panasonic, Maxell and others. They represent good value I've
benn buying mine from www.aprmedia.com. On the whole they are very
reliable - The BBC recently used 1,200 tapes on a documentary and
only had problems with a couple of tapes.
Bog
standard miniDV cassettes – these are made by Sony,
JVC, Panasonic, Maxell and others. They represent good value I've
benn buying mine from www.aprmedia.com. On the whole they are very
reliable - The BBC recently used 1,200 tapes on a documentary and
only had problems with a couple of tapes. 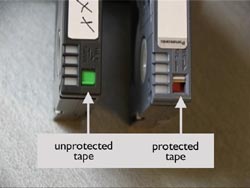 4.
Sony also offers a super-reliable miniDV tape just for HDV recording.
These are manufacturered to a higher standard to minimise drop out which
we've seen can be a
4.
Sony also offers a super-reliable miniDV tape just for HDV recording.
These are manufacturered to a higher standard to minimise drop out which
we've seen can be a  MIXING MANUFACTURERS