|
| urbanfox.tv > camera workbooks > Sony HVR-Z1 contents page > Part 3: Exposure - Iris ND Filters and Zebra Stripes |
ON THIS PAGE: Intro In need of some Z1 or FX1 |
|
INTRO
The reason the camera does this is because if the window is allowed to become too bright, highlights will be crushed. White crushing destroys the detail in the picture and cannot be recovered. The person in front of the window may look dark – but black crushing isn't such a disaster. The detail is still there but you'll have to retrieve it in post. This is why if you are in doubt about what is the correct exposure you will hear people say it is better to under expose than to over expose. Under exposure crushes detail but doesn't destroy it. While over exposure will crush the whites and destroy the detail. So, most of the time auto exposure will do a good job. But, just be aware that when the camera sees a high contrast scene it usually produces poor results. Try as much as possible to use manual exposure, once you take full control you can ensure your pictures are aesthetically pleasing as well as technically correct. In order for the following pages to make sense, you will need to put the iris, shutter and gain into manual and leave them on the following setting…
Now we'll set to work on the iris (F numbers) and then ND Filters. |
|
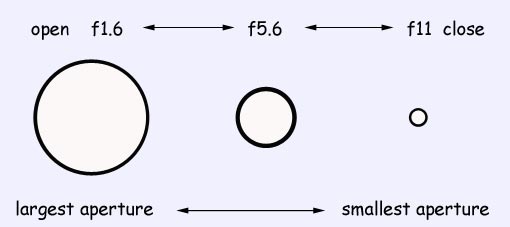
IRIS (F NUMBERS)We can control the amount of light coming through the lens by the use of an IRIS or APERTURE. This works in the same way as the iris (or pupil) of your eye: when you are in bright light the iris is made as small as possible (it 'stops down') to prevent too much light entering your eye, when you are in a darkened room your iris dilates and becomes as wide as possible ('opens up') to let in as much light as possible. With the cameras iris in manual you will have total control over exposure, which will enable you to choose the look you want. Plus, with manual iris you can also select the depth of field you want to work with (see below). There are a selection of apertures to choose from when the camera is in manual exposure mode. Apertures are referred to as f-stops - the smallest aperture is f11, which lets the least amount of light into the camera. The largest aperture is f1.6, which allows the maximum amount of light into the camera. The aperture sizes (f stops) available are: F1.6, F1.7, F1.8 F2 , F2.2, F2.4, F2.6, F2.8 F3.1, F3.4, F3.7 , F4 , F4.4 F4.8, F5.2, F5.6 , F6.2, F6.8, F7.3, F8, F8.7, F9.6, F10, F11 , [close]
|
|
SETTING THE EXPOSURE MANUALLY
As you turn the iris dial you should see the picture get brighter and darker. If you don't it is probably because gain and shutter are in auto and are trying to help you! To get full control make sure you set gain and shutter to manual too. F1.6 is the widest aperture and will let in the most amount of light. If you zoom in with the camera set at F1.6 you will notice the F No will change to around F2.8. This is called ramping and is a feature of all lenses. Be aware it exists but don't get too worried about it. Just be aware that in low light conditions your pictures will look noticeably darker as you zoom in. |
|
ND FILTERSThere are two ND (neutral density) filters. Using an ND filter does not affect the white balance – because they are neutral.
There are four reasons why you may need the ND Filters 1. TOO BRIGHT ND filters act like sunglasses for the camera. Certainly a good rule of thumb is… if you think you need to wear sunglasses because it is a sunny day then the camera will need them too. So, generally you will need to use the ND filters if…
2. F11 IS A BAD PLACE TO BE If you turn the Iris ring you will see that F11 comes just before CLOSE and close results in no picture at all. So, F11 is a dangerous F stop to work with as you might accidentally turn the iris ring too far and loose picture completely. To solve this problem select ND1, which reduces light to about 1/6 th (ie about 2 ½ stops) open the iris by 2 ½ f-stops to compensate and now you are not working at that dangerous F11 but nearer the middle of the range. 3. F11 IS A VERY BAD PLACE TO BE F11 is a very small aperture. These small apertures can exhibit something called diffraction. Diffraction causes light to bend as it enters the camera through the iris. The result will be pictures that look soft and out of focus. Plus, the image will look low in contrast. All in all pretty bad. To cure this we use the ND1 filter again, which forces you to open the iris to compensate – and so work at an aperture that won't cause diffraction. 4. DEPTH OF FIELD Depth of field is the distance between the nearest and farthest “in focus” objects in the picture. It is used as a tool in picture composition…
A shallow depth of field can look good on an interview. Your interviewee will be in focus – but, with a shallow depth of field, the background will be out of focus and less distracting. To decrease the depth of field in a picture open the iris (ie make the aperture larger – e.g. around f2 ). Now, every stop you change doubles the amount of light entering the camera. This means the picture will become overexposed. To counteract this add in some ND filter.
|
|
GETTING THE EXPOSURE RIGHTI reckon there are three ways of setting the exposure correctly. METHOD 1: Does it look right! Yes – simple as that. Look at the LCD screen (or a monitor) and decide whether you like what you see. Unfortunately this method has two downsides. Firstly, you need to set up your viewfinder (and monitor) correctly. If your viewfinder is set too bright or too dark you could get false positives. Secondly, if you're new to camera operation, you're probably unsure what "right" is anyway. But, as you get more experienced with your kit and after shooting in a range of conditions - you'll just sorta know when it is right. METHOD 2: Ask the camera. Zoom in to the subject - go to auto iris and let the camera decide the subject's exposure - go back to manual iris - now zoom out to frame your shot. You must zoom in to the subject to prevent the auto function under or over compensating for the surrounding light levels. Remember, there will be times when the subject will be correct but the background is too bright or too dark. That's the nature of video – it is unable to accurately show a wide range of contrast in one shot. METHOD 3: Use the zebras. See below … The trick is to use all three techniques together. eg start by asking the camera (method 2). It says F5.6, but you've a little more zebra (method 3) than you think is necessary - then iris down until it looks right (method 1). Remember there is no one right exposure. It is all down to the look you want. But, If you are still unsure - it is better to slightly underexpose than to over expose.
|
|
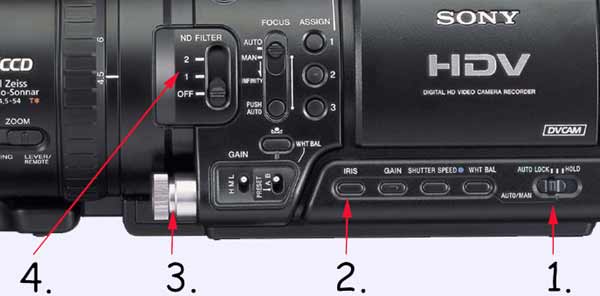
ZEBRA STRIPESZebra patterning can be used as an aid to getting the exposure right. Thanks to the PD150 many people are used to working with Zebras set at 70% and 100%. So, if you prefer, you can continue to use one of those levels. But if you have never used Zebras before lets start at the beginning. Zebra stripes will appear in the viewfinder/LCD Screen as diagonal lines. They will only show up on parts of the screen that reach a certain brightness. So, Zebras set to 70% will only appear on things in the screen that are 70% bright. The PD150 offered Zebras fixed at 70% because white Caucasians are about 70% bright when correctly exposed. The trouble here is that firstly it means you have to constantly stare at a face with Zebras all over it, which can be annoying – and secondly not everyone is a white Caucasian. So, I think Zebras set to 70% are not totally useful. The PD150 also offered Zebras fixed at 100% because this will indicate areas that are over exposed and about to loose detail (due to white crushing). I'm not keen on this level either because I'd prefer a little advance notice of white crushing. I always use my Zebras set to 90% 90% Zebras works for all skin types. What you do is look for a little Zebra in the T zone of a face (the forehead, nose and chin or cheeks, nose and chin). T zone is where people's skin gets a little greasy, shiny and, importantly, bright. Adjust the iris until you just loose the Zebra stripes from the T zone and you should find (using method 1 and 2 too) that exposure will be about right. I also like 90% Zebra stripes because it gives me a little advanced warning that bright areas may be about to burn out. Whatever your preference - if you are going to rely on the zebra stripes make sure you know exactly what level they are set to. The ZEBRA ON/OFF switch is situated on the side panel of the camera body. TO CHECK/CHANGE THE ZEBRA LEVEL
© 2000 - 2010 |
|
|
|
|
|
|
 PART
3: EXPOSURE - (IRIS, ND FILTERS & ZEBRAS)
PART
3: EXPOSURE - (IRIS, ND FILTERS & ZEBRAS) 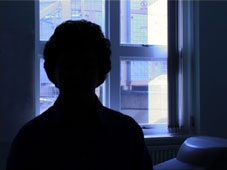 In automatic - shutter, iris, ND and gain all work together trying to make sure the exposure is technically correct. However, do be aware that the camera will always look at the brightest thing in shot and try to get that right. For example, try standing someone in front of a bright window. In automatic the camera will try and get the window's exposure correct. This will mean the person in front of the window will be too dark. [If the room is poorly lit the person will probably be in silhouette.]