urbanfox - company logo  
          urbanfox.tv > camera workbooks > Sony HVR-Z1 contents page > Part 10: audio and sound levels

ON THIS PAGE:

Mic inputs
Inputs and channels
Sound levels

Sony HVR-Z1 hdv camera  PART 10: AUDIO AND SOUND LEVELS
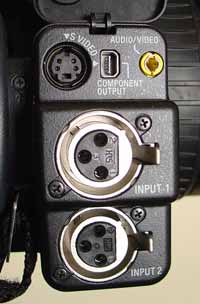
by Christina Fox

It is quite easy to concentrate so hard on getting the pictures right that you end up forgetting about the sound. Remember no matter how exciting the pictures may be - if there is no accompanying sound the impact will be lost.

The camera has its own built in stereo microphone which is fine for recoding general "atmos" (ie background hub-bub and everyday location sound).

However, you can also input two sound sources (usually microphones) simultaneously. These are plugged into the two XLR sockets on the side of the camera.

XLR INPUTS MICROPHONE INPUTS - INTERNAL OR EXTERNAL
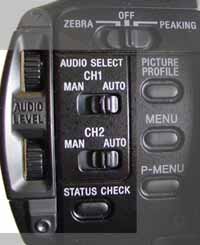
You will have to tell the camera what to record - the internal mic OR the inputs connected via the XLR sockets.

  • Press the MENU button
  • Scroll down to the AUDIO SET MENU using the silver SEL/PUSH EXEC wheel. Press to select.
  • Select MIC SELECT
  • Choose INTERNAL MIC to use the on-board stereo mic
  • Choose XLR to record the external sources plugged into the XLR sockets.


PHANTOM POWER

Each socket has phantom powering for a microphone. If you are using a gun mic such as the Sennheiser ME66 or 416 and Personal (lavaliere) mics, such as the Sony ECM 77, you will have to switch the phantom power ON, to make the microphones active.

Radio mics are powered by bettery power only. Do switch phantom power OFF if your radio mic receiver is plugged into the camera.

Back to the top.

INPUTS AND CHANNELS

There are two XLR inputs (usually two microphones) and two channels ie sections on the tape where the sound is recorded.

You can choose which input is recorded on which channel.

Press the MENU button

Scroll down to the AUDIO SET MENU using the silver SEL/PUSH EXEC wheel. Press to select.

Select XLR SET

Select XLR CH SEL

You now have two options...

CH1 option...... Select this option if you have 2 separate inputs which you want to record separately onto different channels

ch1 select


CH1.CH2 Option... ...select this option if you only have one input that you want to record on both channels.

c1.ch2 select

INPUT 2 is disabled in this mode - mics plugged into input 2 will NOT be recorded.

Back to the top.

audio rear panel Z1SOUND LEVELS

At the back of the camera, beside the battery, you can use the AUDIO SELECT switches to choose from auto to manual control of sound levels for each channel.

Auto will adjust the sound levels for you and is fine for audio that is fairly consistant in level eg during an interview or when you are covering an event over which you have very little control or is happening quite quickly. Manual will give you the most control - but you will need to concentrate harder to get it right (perhaps along with focus, white balance and exposure).  

If you decide to go manual. You will need to use the rotary volume controls to adjust the levels separately for CH1 and CH2 . To accurately adjust the sound levels press the STATUS CHECK button on the back of the camera. Scroll to Page 1 / 4 to see the audio level meter.

A normal speaking voice should be between 10 and 20. Make sure the volume never rises beyond zero into the red as it will distort

To adjust the levels...

  • Press the STATUS CHECK button. The viewfinder/LCD will show the recording levels.
  • You can adjust the incoming sound levels using the rotary AUDIO LEVEL dials.
  • Use the headphones – their volume level can be adjusted using the controls under the LCD screen.
  • To clear the display (so you can see your shot!) just press the STATUS CHECK button.


Back to the top.

HINTS AND TIPS

  • Use headphones. It is the only way of really knowing if the sound is being recorded at the right level/any level!.
  • Get the microphone as close as possible to the sound source - this may mean the microphone will be in shot.
  • If you have time, at each location record 30 seconds of 'atmos' i.e. the natural background sounds of the location.
  • If you must record in a noisy area (e.g. beside a busy road or in a factory) make sure you have a shot of the source of the noise. Viewers will put up loud background noise if they know where the sound is coming from.
  • When working outdoors on a windy day use a wind gag over the microphone to reduce wind noise.


© 2000 - 2010

Back to the top.

Move back to the beginning...
Z1 MANUAL CONTENTS PAGE
Or back to...
Part 9: TIME CODE

Need some help?  We do video camera training.

Find out more about our one-to-one Sony Z1 camera training.

We also offer in-company training for groups of people.

 
| BACK TO HOME PAGE | SEARCH | CONTACT US | TECHNOLOGY ARTICLES | PRODUCTION | CREATIVE STUFF | COURSE INFORMATION | CAMERA WORKBOOKS |

Christina Fox