|
| urbanfox.tv > camera workbooks > Sony DSR500 > Part 3: exposure and gain |
|
ON THIS PAGE: Exposure intro |
|
|||
| We can control the amount
of light coming through the lens by the use of an IRIS or APERTURE. This
works in the same way as the iris (or pupil) of your eye: when you are in
bright light the iris is made as small as possible (it 'stops down') to
prevent too much light entering your eye, when you are in a darkened room
your iris becomes as wide as possible ('opens up') to let in as much light
as possible. Of course your brain does all this for you and is constantly
adjusting your iris depending upon the prevailing light levels. Domestic
and professional cameras allow you to operate the camera iris in manual
or in automatic. However, professional users tend to operate in manual only,
using the auto iris only to do an occasional 'spot check'.
The AUTO EXPOSURE works by looking at the whole scene, averaging out the bright areas and dark areas and setting the exposure for this average. The problems start when something bright or dark comes into frame. e.g. If a white car drives across the frame the average light level of the scene will go up. The camera over compensates by stopping down the iris causing the whole picture to be under exposed. If a black car now drives past the average light level will go down and the iris will open up. Now the whole scene will be over exposed. There are a selection of apertures to choose from when the camera is in manual exposure mode. Apertures are referred to as f-stops (or sometimes just "stops") - the smallest aperture is f16 which lets the least amount of light into the camera. The largest aperture is f1.6 which allows the maximum amount of light into the camera. The aperture sizes (f stops) available are:
|
||||
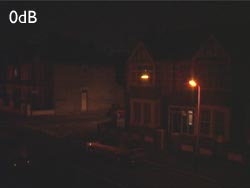
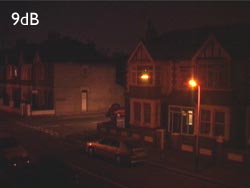
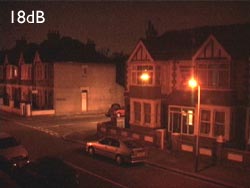
GAINWhen shooting in low light conditions (e.g. at night or in a poorly lit room) the iris will be fully OPEN at f1.7 but, the camera may still needs more light to produce a picture. In this type of situation you will find the GAIN helpful. The GAIN is an electronic method of increasing the brightness of your picture. There are three gain levels to chose from:
It is possible to alter these preset gain levels by entering the advanced menu settings. As you dial in more and more gain you will notice that the picture becomes grainy (or noisy) and picture quality deteriorates. If you are working in extremely low light conditions the HYPER GAIN button will increase the gain by around 40dB. The HYPER GAIN switch is positioned in the bottom left hand corner under the side panel cover. Once the HYPER GAIN is switched on - the L M and H gain selector is disabled. Which is just as well - 40dBs is a lot of gain and a lot of noise in the picture. |
||||
BEND AND STRETCH!It is possible to adjust areas of the picture electronically to improve picture output… The contrast ratio of most video cameras is now in the region of 50:1 i.e. the camera can accurately show two objects one light one dark (in the same shot) as long as the difference difference in brightness is no greater than a ratio of 50:1. However the camera can improves this ratio and reduces the possibility of for example, silhouettes, OUTPUT SELECTIONS
In reality I found it difficult to see what the DynaLatitude was really doing. It certainly didn't seem to improve the shot on the monitor I had connected to the camera. Perhaps you'll have better luck. |
||||
ZEBRASZebra patterning is an aid to getting the exposure right. There are two zebra patterns available with this camera Zebra 1 (Appears in the viewfinder as the familiar diagonal zebra stripes) and Zebra 2 (appears as polkadots). The Zebra ON/OFF switch is situated on the side panel of the camera body. When switched on
It is usual to operate with Zebras at around 90 or 95%.
TO CHANGE THE ZEBRA LEVEL
Finally arrow down to EXIT MENU option at the bottom of the screen. Press the Menu dial to exit. Zebra - Page 4 MENU set to:
|
||||
|
|
||||
|
||||
|
|
||||
 PART
3: EXPOSURE AND GAIN
PART
3: EXPOSURE AND GAIN