|
ON THIS PAGE:
Power Switch
Inserting a tape
Record button
Stills
Zoom
Auto lock
Auto focus
Steady shot
Edit search
Pre flight checks
LCD screen
|
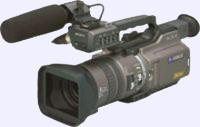 PART
1: GETTING STARTED WITH THE PD 150 and PD 170 PART
1: GETTING STARTED WITH THE PD 150 and PD 170
by Christina
Fox
You will see from looking at the camcorder and its manual that there
are a vast array of buttons. Some of them you will use regularly and are
essential. Listed below are those buttons you need to get to know to get
off to a quick start.
|
| POWER
SWITCH - under the right thumb when the camera is hand held
The power switch has four positions….
- Press in the small green button and then rotate the power switch to
VCR. The camera should bleep and the transport controls illuminate
- you can use the player/recorder to review your tapes by operating
the STOP, REWIND, PLAY, FAST FORWARD and PAUSE buttons.
- OFF (CHG) is obviously the power off position and used to save
battery. You should also use this position when charging a battery.
- Press in the small green button and then rotate the power switch to
CAMERA. You should now see a picture.
- MEMORY - select when recording information to the memory stick
NB -If you still cannot see a picture in the viewfinder check that you
have removed the lens cap and then check that your battery has some charge
in it.
|
INSERTING A TAPE
- Press the small blue EJECT button inwards and then slide downwards.
- Insert the tape
- First close the inner cassette
compartment first where it says PUSH
- Finally close the outer cassette lid where it says PUSH
|
START / STOP - under the right thumb when the camera
is hand held
This is a red button with the power switch control around it.
TO START RECORDING - Press the red button, the message REC
will appear in the viewfinder
TO STOP RECORDING -Press the red button again, the message STBY
will appear in the viewfinder.
NB when there is a tape in the camera it will automatically default to
save mode after five minutes. You will still see a picture but it will
take a few seconds longer to drop into record.
|
RECORDING STILL IMAGES
You may have to record still images for download onto a web page.
- Press the silver PHOTO button (beside the zoom rocker) firmly.
The camera will "blink" and record the still for seven seconds. Seven
red markers will countdown the recording.
- Pictures can also be recorded on a memory stick inserted into the
camera.
|
POWER ZOOM
- The 'T' stands for TELEPHOTO and will zoom the lens in.
- The 'W' stands for WIDE-ANGLE and will zoom the lens out.
Press the zoom controller gently for a slow zoom speed and press harder
for a faster zoom speed.
There is also a manual zoom ring (behind the focus ring) The zoom speed
is controlled by the speed at which the ring is turned. Turn clockwise
to zoom out and anticlockwise to zoom in.
|
AUTO LOCK
- When the HOLD/AUTO LOCK switch is in AUTO LOCK position
- the camcorder will automatically adjust the IRIS, GAIN, SHUTTER SPEED
and WHITE BALANCE.
- With the HOLD/AUTO LOCK turned to the middle position you have
the choice of operating the above features manually or on auto
- To retain the settings you have adjusted manually, turn the HOLD/AUTO
LOCK to the HOLD position.
|
AUTO FOCUS
- With the FOCUS switch set to AUTO the camera will automatically
focus for you.
- Set the switch to MANUAL to take control of focusing and
 appears in the viewfinder.
- The PUSH AUTO button below will automatically focus the camera
on whatever is in the centre of the picture. When you release the button
it will revert to the manual mode.
|
STEADY SHOT
- This is an optical means of compensating for camera shake.
- You can switch it on/off with the STEADY SHOT in the menus.
- When switched off - the
 off
symbol appears in the viewfinder/LCD off
symbol appears in the viewfinder/LCD
- It should be switched on in most circumstances because even lightweight
tripods are inherently unstable.
For a great explanation on how image stabilisers work take a look at
this from the tvcameramen.com
site.
|
EDIT SEARCH
- Momentarily holding down the EDIT SEARCH rocker marked "-"
allows you to look at the last two seconds of the last picture you recorded.
- By holding down the "+" or "-" side of the edit
search you can forward or rewind through the tape.
Be careful when you use the edit search facility. If you forward onto
blank tape and start recording, there will be a break in time code - which
will give you problems when you come to edit. Always cue up on the last
recorded picture to ensure you have continuous timecode throughout your
rushes. The END SEARCH function will help you do this…
The END SEARCH button will take you to the end of the last recorded
section. The camera rewinds or fast forwards the tape until it finds the
last picture frame - it will play the last five seconds of your pictures
and park, ready to record.
|
PRE FLIGHT CHECKS
- Always check that the viewfinder is in focus.
- First of all make sure the lens cap is in place. All you should be
able to see in the viewfinder is some of the time code, sound and battery
data.
- Under the rubber eye cup, on the viewfinder, you'll find the viewfinder
diopter adjustment.
- Alter the diopters adjustment until the data is completely out of
focus.
- Slowly bring the data back into focus. You may find it helps to rock
the adjuster backwards and forwards – until your sure that the symbols
are in perfect focus.
- Check all of your batteries – you
should have at least three fully charged camera batteries in
your kit along with some spare AA batteries for your microphones.
- Check the tripod hot shoe matches the tripod. You cannot
mix and match one manufacturers hot shoe with another manufacturers
tripod.
- Adjust the Velcro fastening on the side strap until it is comfortable
for your hand size.
|
THE LCD SCREEN
- Once you pull out the LCD screen the viewfinder is automatically switched
off.
- However, both the Viewfinder and LCD will be on together when the
screen is turned through 180 degrees
- Once the LCD screen is re-housed into the side of the camera the viewfinder
becomes operational.
- When the screen is turned through 180 degrees (to do a piece to camera)
it drops into "mirror mode".
- From that screen position you can also push the screen flat against
the camera – with the screen facing outwards. This may be useful when
conducting an interview with the camera on a tripod.
- You can adjust the brightness of the screen by using the LCD BRIGHT
+/- controls on the left hand edge of the screen.
- You can also adjust the cameras backlight brightness in the menus
NB in mirror mode a small cartoon face appears in the viewfinder (cute!).
Take care of the LCD screen….
- Do not touch the surface of the screen
- Do not lift the camera by the viewfinder or screen
- Remember the LCD screen uses more battery power than the viewfinder.
Revert to viewfinder only use, if battery power is running out.
- Exposing the screen to sunlight for extended periods will damage it.
©
2000 - 2010
|
- Move on to...
- Part 2: FOCUS
- or go back to
- WORKBOOK CONTENTS
|
|
|
|
Christina
Fox
|
