|
| urbanfox.tv > camera workbooks > Sony PD150 and PD170 > Part 3: exposure and gain |
|
ON THIS PAGE: Exposure |
|
||||
|
We have to be able to control the amount of light that passes through the lens and goes into the camera. If there is too much light the picture is said to be over exposed - too little light and it will be under exposed. We can control the amount of light coming through the lens by the use of an IRIS or APERTURE. This works in the same way as the iris (or pupil) of your eye: when you are in bright light the iris is made as small as possible (it 'stops down') to prevent too much light entering your eye, when you are in a darkened room your iris becomes as wide as possible ('opens up') to let in as much light as possible. Of course your brain does all this for you and is constantly adjusting your iris depending upon the prevailing light levels. Domestic and professional cameras allow you to operate the camera iris in manual or in automatic. However, professional users tend to operate in manual only, using the auto iris only to do an occasional 'spot check'. The AUTO EXPOSURE works by looking at the whole scene, averaging out the bright areas and dark areas and setting the exposure for this average. The problems start when something bright or dark comes into frame. e.g. If a white car drives across the frame the average light level of the scene will go up. The camera over compensates by stopping down the iris causing the surrounding picture to be under exposed. If a black car now drives past the average light level will go down and the iris will open up. Now the surrounding scene will be over exposed. This exposure "hunting" looks amateurish, is a dead give away that you're in auto AND is totally unnecessary. There are a selection of apertures to choose from when the camera is in manual exposure mode. Apertures are referred to as f-stops (or sometimes just "stops") - the smallest aperture is f11on most cameras (although some lens are able to offer even smaller apertures) which lets the least amount of light into the camera. The largest aperture is f1.6 which allows the maximum amount of light into the camera. The aperture sizes (f stops) available are:
|
|||||
|
SETTING THE MANUAL EXPOSURE
To return to AUTO mode just press the IRIS button again. NB if the gain is in AUTO mode when you manually select iris – you'll find the gain increase as you stop down in low light conditions. If you do not want gain to rise make sure you switch it to manual and set it to 0dB until you need it. |
|||||
TOO MUCH LIGHTDaylight on a clear sunny day can be around 35,000 lux. In very bright sunlight or in highly reflective places (i.e. where there is sand or snow) it is necessary to reduce the amount of light entering the camera so that the pictures do not become over exposed. There are two ways you can reduce the amount of light entering the camera:
|
|||||
HINTS
|
|||||
ZEBRASThe ZEBRA switch is in the panel protected by the LCD screen.
Zebra stripes are a device that puts diagonal lines into highlights in the viewfinder (not on to the tape! Just in the viewfinder). They act as an indication of exposure levels and so can be used as an aid to getting the exposure right. Think of the 100% zebra level as an audio meter it tells you when things are too loud (in this case, too bright). When you record sound too loud, it distorts and becomes unusable. Well in video terms if large parts of your picture are 100% bright and above the detail in those areas will becomes crushed (and so lost ). The 70% zebra is probably more important, because it help you get faces correctly exposed. White Caucasian faces - when correctly exposed are between 60-70% bright. So if a face has a little bit of 70% zebra on it then it will be about right. There will always be a few hot spots such as noses, foreheads and the shiny bald head - it's the reason we use makeup in TV to reduce the hot spots. Remember a good way to check exposure is to ask the camera. Zoom in to the face - go to auto iris and let the camera decide the face's exposure - go back to manual iris - and zoom out to frame your shot. There really is no real guideline as to how much Zebra you'll see in the picture. It entirely depends upon what you are shooting and how much there is of it in the frame. Eg a correctly exposed shot of the sky could have 70% zebras all over it - but little or no 100% zebras PLEASE NOTE -
|
|||||
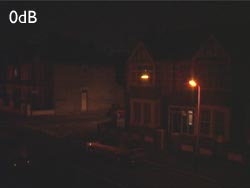
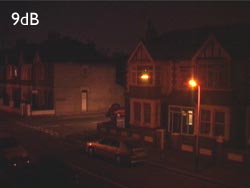
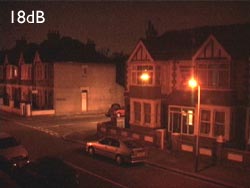
GAINWhen shooting in low light conditions (e.g. at night) the iris is will be fully OPEN at f1.6 but, the camera may still needs more light to produce a picture. In this case the EXPOSURE control can be used to switch in GAIN (up to 18dB) until the correct exposure is achieved The GAIN is an electronic method of increasing the brightness of your picture. There are seven gain levels to chose from:
SETTING THE GAIN MANUALLY
To return to AUTO mode just press the GAIN button again. As you dial in more and more gain you will notice that the picture becomes grainy or noisy. |
|||||
AE SHIFTYou can adjust the automatic exposure levels to give you brighter or darker pictures compared to the normal default setting.
|
|||||
HOW DO YOU EXPOSE CORRECTLY?I reckon there are three ways of setting exposure.
The trick is to use all three techniques together. eg start by asking the camera (method 2). it says F5.6, but you've a little more zebra (method3) than you think is necessary - then iris down until it looks right (method 1). BEWARE... My advice would be to set the shutter manually to 50 (PAL) or 60(NTSC). Only use the shutter for effect. Gain should be set to 0dB. That said you can usually get away with 3 and 6dB without people noticing. At 9dB and above you'll start to get grainy pictures. Expose using manual iris (or in Auto to start with until you get used to the camera). Zebras on 70% with the occasional flick to 100%. ..and if the sun comes out and it all gets a bit too bright - flick in one of the ND filters. |
|||||
|
|||||
Reader's Comments>>>>How do I use the Zebras?<<<<< Zebras are one of the tools for getting exposure right. Think of the 100% zebra level as an audio meter it tells you when things are too loud (in this case, too bright). When the sound is recorded too loud, it distorts and becomes unusable. Well in video terms if large parts of your picture are 100% bright and above the detail in those areas will becomes crushed (and so lost ). The 70% zebra is probably more important, because it help you get faces correctly exposed. White Caucasian faces - when correctly exposed are between 60-70% bright. So if a face has a little bit of 70% zebra on it then it will be about right. There will always be a few hot spots such as noses, foreheads and the shiny bald head - it's the reason we use makeup in TV to reduce the hot spots.
|
|||||
 PART
3: EXPOSURE AND GAIN
PART
3: EXPOSURE AND GAIN