ON THIS PAGE:
Colour temperature
Light source table
The importance of white balancing
When to do one
White balance settings
Manual WB
Problems white balancing?
In need of some Z1 or FX1
camera training? We offer
one-to-one personal training and
training for groups.
More info... |
 PART
6: WHITE BALANCE PART
6: WHITE BALANCE
by Christina
Fox
To the eye - the sun, a fluorescent tube or a light bulb appear to
produce uniform white light. In fact, different light sources produce
different mixtures of the visible light spectrum.
These light sources appear as coloured light to the camera. But if
we white balance we can make the camera see the world the way
our eyes see the world.
But before we get too far ahead - it will help to understand the colour
temperature of light. Luckily you probably know something about this
already.
|
COLOUR TEMERATURE
If you look at the video below you will see a toaster being switched
on. You will be able to tell when it is ready to make toast - because
the elements will be glowing red. You know that red means hot - you
have already made the connection between the colour of the light given
off from the toaster and how hot it is.
Lord kelvin worked this out this connection with heat and light too.
He experimented with a black body radiator (not a toaster) but he say
that as it heated up the colour of light changed.
OK now think about a light bulb - inside is a filament (made of tungsten
metal). When you switch on the electricity, a large current flows through
a small filament, it gets hot and starts to glow. (ie It behaves like
our toaster). The colour temperature of tunsten light usually lies
at around 3,200 Kelvin.
It is actually a warm reddish orange light.
The sun is another main source of light. As you'd expect it is hotter
than a light bulb! The colour temperature of daylight is around 5,600K
(at noon). But it can vary through out the day. If you think of the
most beautiful sunset you ever saw - you'll probably remember all the
reds and oranges - not the blues.
So, colour temperature
on the ground is pretty variable from as low as 2,000 Kelvin up to 20,000
Kelvin. The table below shows the range of temperature possible for
daylight and the conditions that effect it (along with some other light
sources).
|
LIGHT SOURCES |
COLOUR TEMPERATURE (Kelvin units) |
|
Candle |
1,930 |
| Sodium vapour lights (ie street lighting) |
2,000 |
| Domestic tungsten light bulbs |
2,600 - 2,900 |
| TV studio tungsten lighting (2000 Watts) |
3,275 |
| TV studio tungsten lighting (5000 Watts) |
3,380 |
| Sunrise, Sunset |
2,000 -3,000 |
| Fluorescent tube |
4,800 |
|
Noonday sun |
5,000 - 5,600 |
|
HMI and MSR lights |
5600 |
| In shade ( light only from hazy sky) |
7,500 - 8,400 |
| In shade ( light only from Blue sky) |
12,000 - 20,000 |
|
WHY IS WHITE BALANCING IMPORTANT?
When the camera does a white balance - it analyses the
spectrum of colours hitting a white piece of paper. It juggles these
until the white paper looks white.
So, white balancing tells the camera what colour of
light it is working in and what to do about it. Once the camera has
successfully white balanced the pictures it records in that location
will look something similar to how our eyes see the same scene.
You
have to be careful where you white balance. Beware
of white balancing in the wrong light source e.g. by a window and
then shooting the interview in a corner of the room lit by tungsten
light. Whatever light falls on your subject should also fall on the
white paper you use to perform a white balance - then they will look
the right colour.
Back to the top. |
WHEN SHOULD YOU PERFORM A MANUAL WHITE BALANCE?
- In mixed light (e.g. in a tungsten lit room with daylight coming through
a window).
- When shooting subjects lit by fluorescent light
- If light conditions are changing quickly (i.e. at sunrise and sunset
when you want the shots to match).
- Every time you move from one source of light (e.g. outdoors) to another
source (i.e. indoors).
Back to the top. |
SETTING THE WHITE BALANCE
There are four white balance modes to choose from:
|
SYMBOL |
COLOUR TEMP |
WHEN DO I USE IT |
|
 |
adjusted manually by the operator by performing a "white balance". |
In locations lit with fluorescent tubes or mixed light (i.e. the
sun and artificial light) |

|
"OUTDOORS"
pre-set to 5,800K
(an average day) |
You should use this mode when working in daylight. You MUST use
this mode if you wish sunrise/sunsets to look "golden" |
|

|
"INDOORS"
pre-set to 3,200K |
You should use this mode when working in tungsten light. |
|
NO SYMBOL |
AUTOMATIC MODE |
In this mode the camera will white balance for you - given sufficient
time to analyse the light it is working in. (about 5-10 seconds) |
Back to the top. |
In reality things are never as clear cut as they seem...
|
AUTO WHITE BALANCE |
MANUAL WHITE BALANCE |
|
|
|
|
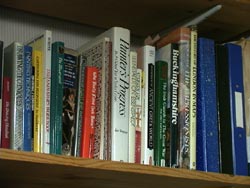
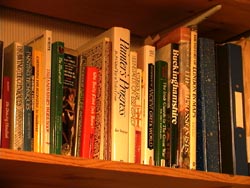
These picture were taken in my dining room - which is lit by tungsten
light.
On my computer monitor the manual white balance looks a little
blue. While the auto white balance looks spot on.
Preset 5,600 Kelvin looks orange - as expected.
While the preset 3,200Kelvin looks OK.
But in this case I think I prefer the auto.
|
|
|
|
|
PRESET 5,600K (SUN SYMBOL) |
PRESET 3,200K (LIGHTBULB SYMBOL) |
|
|
AUTO WHITE BALANCE |
MANUAL WHITE BALANCE |
|
|
|
|
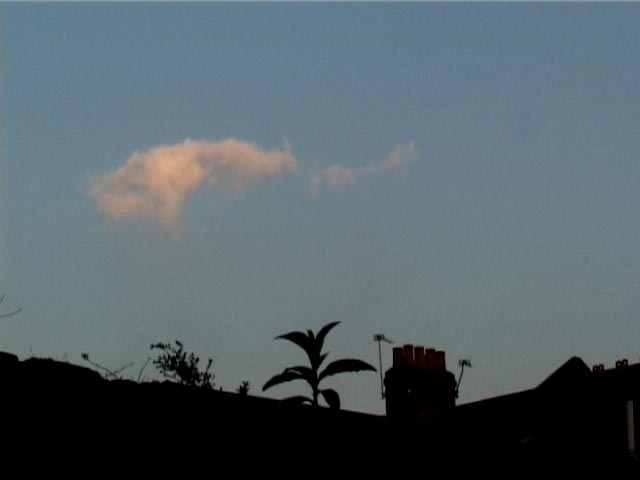
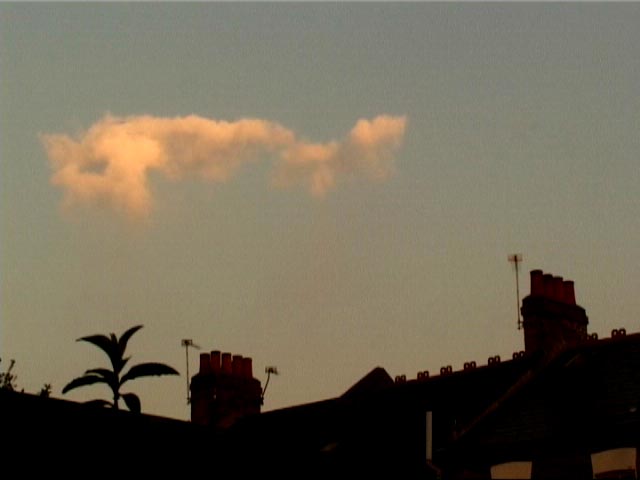
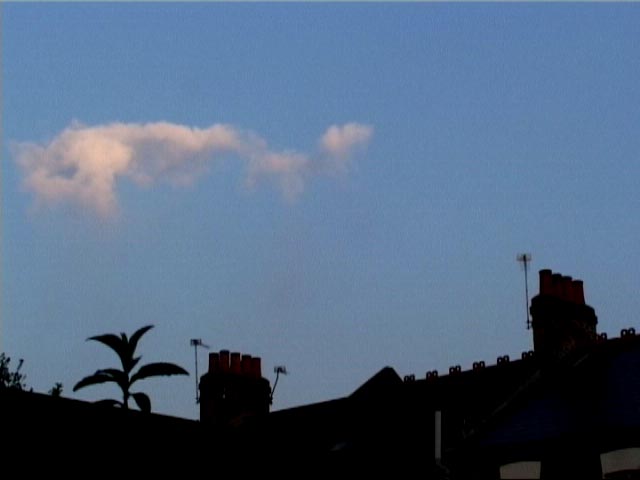
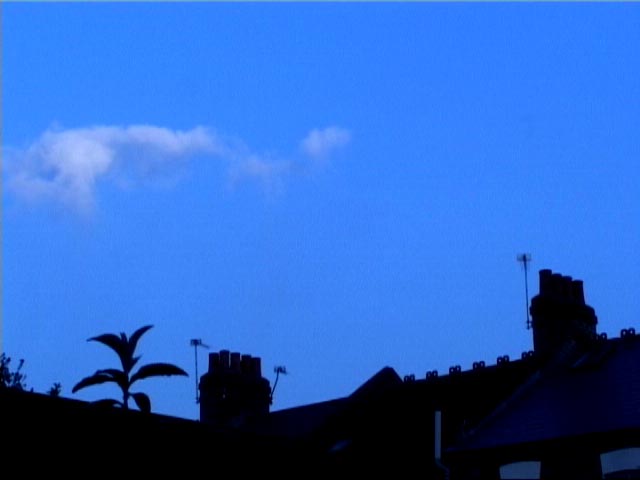
These pictures were taken in my garden. Between the auto and the
manual white balance I prefer the auto.
The preset 3,200 Kelvin has made the sky look very blue - as expected.
But in this shot - it looks pretty good.
The preset 5,600 Kelvin setting is probably more natural and closer
to the real thing. |
|
|
|
|
PRESET 5,600K (SUN SYMBOL) |
PRESET 3,200K (LIGHTBULB SYMBOL) |
|
|
|
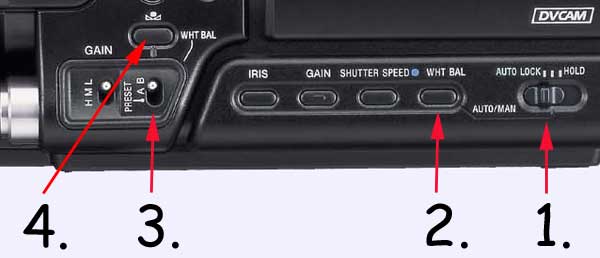
HOW TO DO A MANUAL WHITE BALANCE
1. Set the AUTO LOCK switch to the
middle position
2. Press the WHT BAL button to select manual
3. Select
white balance memory A or B (either the A or B symbol appears in
the bottom right hand corner of the viewfinder/LCD).
4. Point the camera
at a white piece of paper and this time press the black tablet-shaped
button marked with the symbol above it. The symbol will flash in
the viewfinder/LCD while the camera is calculating the correct white
balance.
When the symbol stops flashing the white balance is complete.
If the symbol continues to flash slowly try again in
auto iris mode
- or go to auto white balance mode
You have two white balance memories. I always place daylight (blue)
white balances in memory B. Then all white balances done in artificial
light go in memory A. That way I can switch easily from one to the other
as I move from one location to another.
Back to the top.
|
AUTOMATIC WHITE BALANCE
Auto white balance can be useful when you are moving from one location
to another and don't have time to white balance. However, do be
aware that the camera will be subtly but, constantly adjusting and changing
the white balance so, it may be difficult to edit shots from the end
of a sequence into the beginning of a sequence.
To select Auto White Balance
Either
Switch the AUTO LOCK switch (No
1 above) to the auto lock position. However, this will lock iris, gain
and shutter into auto too.
OR
Leave the AUTO LOCK switch (No
1 above) in the middle position. Then press the WHT BAL button (No 2 above)
until you see NO icons in your LCD screen connected to white balance.
Back to the top. |
PRESET WHITE BALANCE
The camera has two preset white balance options.
You can assign a tungsten 3,200 Kelvin (INDOOR) white balance to the
preset selection. This would be useful if you are doing a recording
in a studio, locations only lit with tungsten light or it could also
be used for shooting at night when most light will be tungsten or other
artificial lights.
Alternatively, you can assign a Daylight 5,800 Kelvin (OUTDOOR) white
balance to the preset selection. This would be useful if you are shooting
in daylight or want to shoot golden sunrises and sunsets.
My recommendation would be to assign 5,800 Kelvin option to the preset
switch. Because, the camera has a useful function that gives you the
ability to adjust the white balance to give warmer or colder pictures
(but, only if the preset is set to daylight). To do this you first must
go into the menus...
- Press the MENU button
- Scroll down to the CAMERA SET MENU using
the silver SEL/PUSH EXEC wheel.
- Click on the SEL/PUSH EXEC wheel and
select WB PRESET
- Set this to OUTDOOR
The outdoor setting is now assigned to the preset white balance switch.
NEXT
- Stay in the MENU
- Scroll down to the OTHERS MENU using
the silver SEL/PUSH EXEC wheel.
- Click on the SEL/PUSH EXEC wheel and
select ASSIGN BUTTON
- Set ASSIGN2 to WB OUTDR LV+
- Set ASSIGN3 to WB OUTDR LV-
- Press the MENU button to exit the menu.
To see how this works.
- Set the AUTO LOCK switch to the middle
position.
- Press the WHT BAL button to select manual
- Select white balance PRESET a sun symbol
appears in the bottom right hand corner of the viewfinder/LCD.
- Now if you repeatedly press the ASSIGN
2 button the picture will look warmer
- If you repeatedly press the ASSIGN
3 button the picture will look colder.
- Each step adjust the colour temperature
by 500 Kelvin. Adjust until you get the look you want.
Setting |
Colour Temp (Kelvin) |
|
+7 |
9,300 |
|
+6 |
8,800 |
|
+5 |
8,300 |
|
+4 |
7,800 |
|
+3 |
7,300 |
|
+2 |
6,800 |
|
+1 |
6,300 |
|
0 |
5,800 |
Good for average day |
-1 |
5,300 |
|
-2 |
4,800 |
|
-3 |
4,300 |
|
-4 |
3,800 |
|
-5 |
3,300 |
Good for Tungsten |
-6 |
2,800 |
|
-7 |
2,300 |
|
|
TROUBLE SHOOTING
HELP! The camera won't white balance manually...
There are several possible reasons why your camera won't white balance....
- Are the surroundings too bright or too dark.
- If the picture is very bright the camera is getting too much information
- if it is dark, not enough. If you have control over lighting conditions
- change them. Otherwise try auto exposure and then a manual white
balance.
-
-
- The ambient colour temperature is too high or too low for the electronics
to jiggle around with.
- To make a decent attemp at a white balance the camera needs light
that has a smattering of all the colours in the visible spectrum.
Try using the preset white balance and adjust using the WB OUTDR LV+
and LV- feature as mentioned above.
Just a thought... If you try and white balance under sodium lighting
you'll probably fail. Sodium street lights are practically a big spike
of orange light and not a lot else. In this case either....
- 1) Go to auto white balance
- 2) select the tungsten preset (the little light bulb symbol) - remember
it's probably getting dark anyway (otherwise why are the street light
on?) so the pre-set white balance will be OK because the majority of
light around will be artificial anyway.
©
2000 - 2010 Back to the top.
|
- Move on to...
- Part 7: BATTERIES
- Or back to...
- Part 5: THE SHUTTER
-
Need some help? We do video camera training.
-
Find out more about our one-to-one
Sony Z1 camera training.
We also offer in-company training
for groups of people.
-
|
|
|
|
Christina Fox
|