
|
| urbanfox.tv > camera workbooks > Sony PD150 and PD170 > Part 9: sound |
|
ON THIS PAGE: |
|
||||||||||||||||||||||||||||||
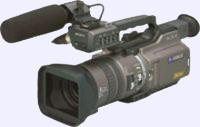
MICROPHONE INPUTSThe camera comes with one microphone. But, it is possible to plug in two microphones into this camera. The two microphones can be recorded on the two separate sound tracks simultaneously. They are plugged into the microphone sockets behind the input selector console. On the other side of the sockets is a bank of switches. This table is supposed to represent each switch position and explain what it is for...
|
|||||||||||||||||||||||||||||||
SOUND LEVELSThe recorded sound can be adjusted by the AUTOMATIC GAIN CONTROL (AGC) to a predetermined level. But, AGC does have problems - if your subject is talking - the level will be set by the camera, when they stop talking the camera will then raise the background sound level. This raising and lowering of the background sound every time your subject stops then starts talking is called pumping and it is at its most objectionable when the background sound is noisy e.g. a crowd at a football match or by a busy road. You will have more control over sound levels if you adjust them manually. First you must go into the menus...
|
|||||||||||||||||||||||||||||||
HINTS AND TIPS
|
|||||||||||||||||||||||||||||||
|
The sound facilities on this camera are a vast improvement on the old VX1000. However there were reported sound problems in the first batch of cameras produced. If you want to know more go to... |
|||||||||||||||||||||||||||||||
|
|||||||||||||||||||||||||||||||
Reader's CommentsI have the pd150 and always seem to get bad sound at events. of course,the dj is always playing load with subwoofers so that doesn't help. i have the audio technica stereo mic that i use attached to the cam. e.j. The trouble with microphones strapped to the top of the camera is they tend to pick up anything and everything - rather than being selective. what you really need is a clean feed of the sound from the desk in one channel and general "atmos" (or other sound sources) in the other channel. For the "clean sound" a radio mic kit would be ideal. But don't use the mic!. Plug the output of the DJs desk (usually line level) into the radio mics transmitter. Then plug the receiver into Channel 1 of the camera. A radio mic kit is best for this sort of thing because you can take a cleen feed from the desk and still be free to roam around getting shots. Now Channel two is free for general "atmos" or interviewing people at the gig. But if you're going to interview people you must get the mic off the top of the camera - attach a 1 meter cable - and get the mic up close. Especially important in a noisy environment. Now when you come to edit you can choose the best sound channel that goes with the shot. Plus, when at any location always get a bit of "wild track" ie about a minute or two of sound, that you can use in the edit, that will get you over a noticeable change in sound. I used to cover public events like this all the time. e.g. press conferences - Radio mic kit taking the output from the PA system and a hand held mic for the reporters questions. I'm a big fan of radio mics they're an invaluable piece of kit. As I've said you don't just have to plug a mic into them and they allow you to roam around. If you try it - let us know how you get on. Christina From: Paul
- Date: 23 February 2001 14:28 Subject: PD-150 Hi the microphone supplied with the PD150 is the ECM-NV1
- I double checked and you're absolutely right it's mono. My mistake.
I've corrected the site - so, thanks for pointing that out.
From what I've read the PCM Digital Stereo gives you either two 12 bit stereo tracks (as mentioned in the manual)- which is near CD sound quality. The one 16 bit stereo track can be used for DAT quality recording. You could take a look at http://www.shortcourses.com/video/chapter07.htm and Digital Idiots for more info (I'm afraid I'm a bit of a Stereo Idiot). However, for the best advice you could contact Sony - I've attached the Sony PD150 blurb which has the UK phone numbers. If you're outside the UK you could try their website - although you'll need patience their website is very badly organised and searches don't always give useful results. All the best. Christina
|
|||||||||||||||||||||||||||||||
 PART
9: SOUND
PART
9: SOUND